How to Build an Image Compressor with AI
Build a browser image compressor in Layerwise. Keep files on the device, choose formats and presets, run encoders in workers, fit images under a size limit, test, and publish.
Table of contents
An image compressor looks like one button: drop a photo in, get a smaller one out. The decisions behind that button decide whether people trust it. Are their photos uploaded to a server? Does the page freeze on a batch of twenty? What happens when an image cannot get under the size they need? Answer those before asking an AI to write code, and the first version is much easier to test.
This guide builds a browser image compressor with Layerwise. You will decide where images are processed, define the settings and presets, plan the slow parts, start from the PixelNest template or a prompt, test with real files, and publish.
1. Decide where images are processed
There are two reasonable designs:
- On the server. The browser uploads each image, and the server returns a compressed copy. Results are the same on every device, but you pay for the processing, store images at least briefly, and must tell users their files leave their device.
- On the device. The page decodes and encodes images itself with WebAssembly builds of the image codecs. Nothing is uploaded and there is no server cost, but speed and the largest batch depend on the visitor's computer.
PixelNest uses the second design. It reads JPEG, PNG, WebP, and AVIF files up to 50 MB each and writes any of those formats. It has no account pages, because there is nothing to save on the server; only a running total of space saved is kept in the browser. The project still has the starter's database and sign-in server, unused, in case you later add something that needs accounts, such as presets that follow a user between devices.
If you promise that images stay on the device, keep that promise in the code. The page still loads fonts and Analytics, so claim that images are not uploaded rather than that the page makes no requests.
2. Define the settings and presets
Every image is compressed from the same settings record, so write it down first. This is PixelNest's:
type CompressionSettings = {
  format: 'auto' | 'jpeg' | 'png' | 'webp' | 'avif';
  lossless: boolean; // WebP only
  quality: number; // 5 to 100
  sizeMode: 'quality' | 'target'; // a quality, or Fit under size
  targetKB: number;
  resize: {
    mode: 'none' | 'fit' | 'percent';
    width: number | null;
    height: number | null;
    lockAspect: boolean; // fit inside the box, or resize to it exactly
    percent: number;
  };
  crop: 'original' | '1:1' | '4:5' | '16:9'; // center crop
};
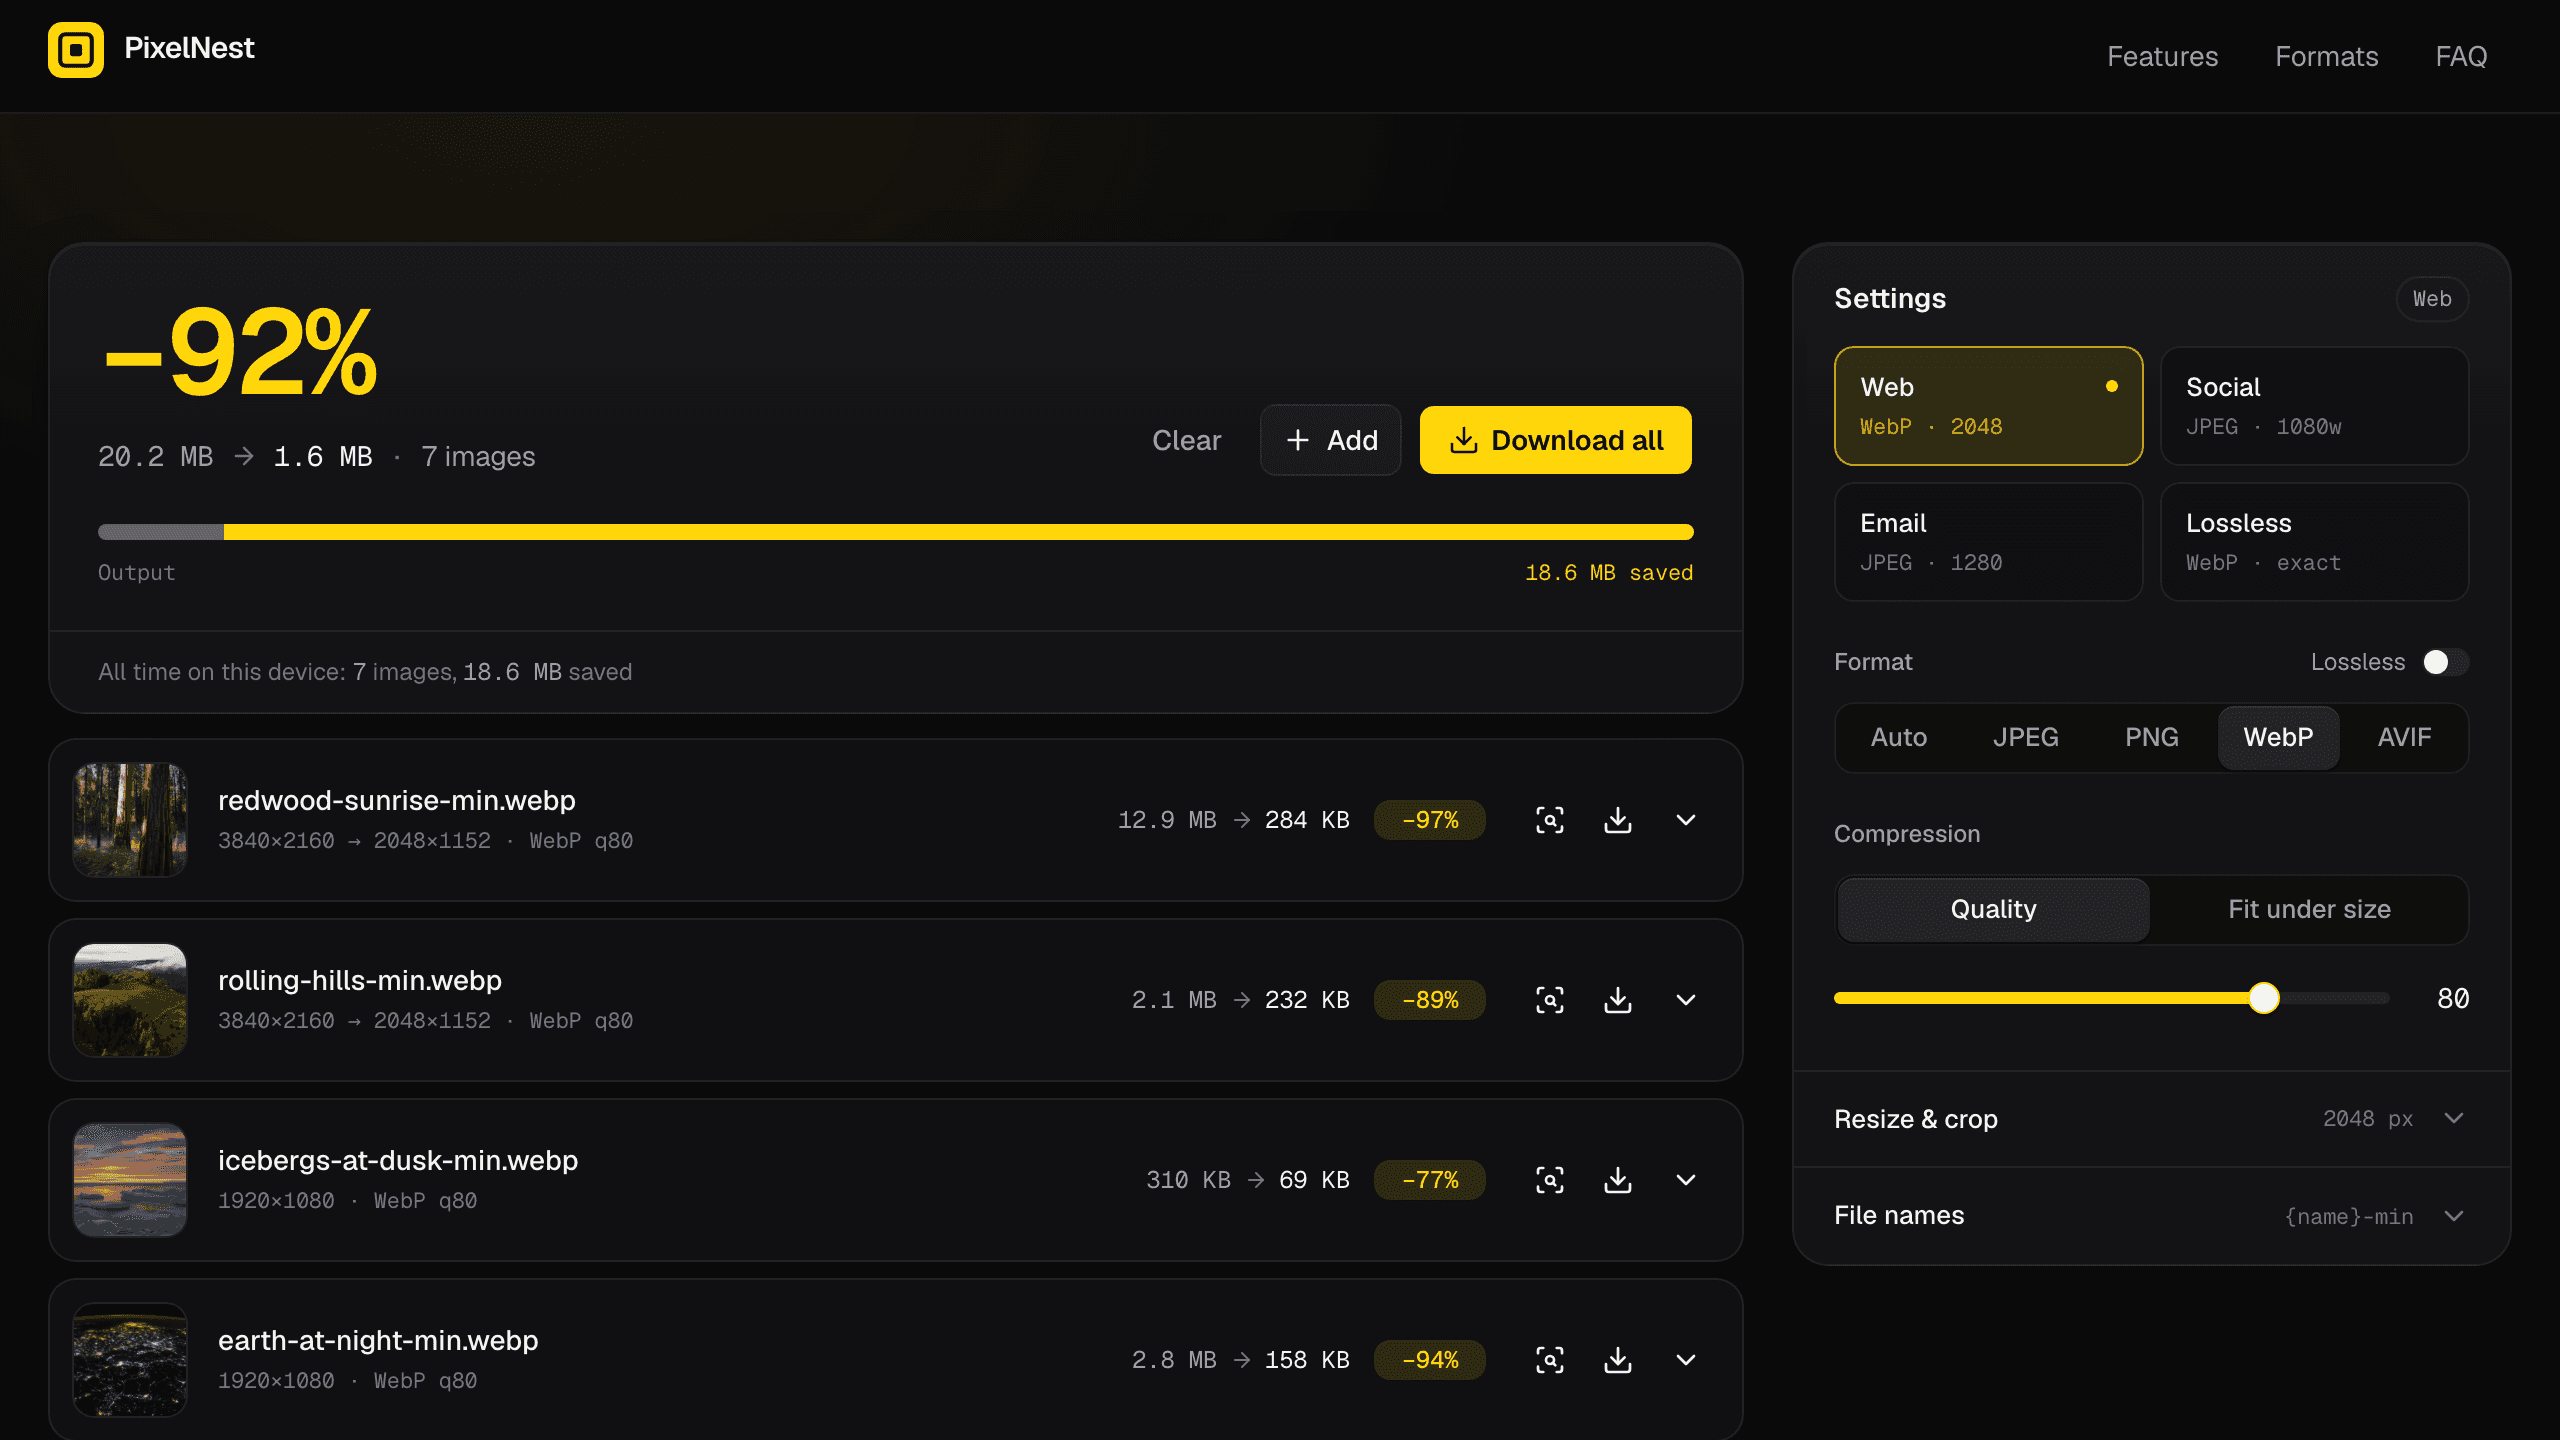
A preset is a named settings record. PixelNest has four: Web (WebP, at most 2048 pixels), Social (JPEG, at most 1080 pixels wide), Email (JPEG, at most 1280 pixels), and Lossless (WebP lossless). Auto keeps JPEG and AVIF files in their own format and turns PNG and WebP into WebP. Choose presets from where your users post images, not from what the codecs can do.
An image can also have its own settings. In PixelNest, changing a row's Image settings stores a copy of the settings on that image and marks the row Custom, and Apply to all removes those copies. Decide whether a change to the shared settings should overwrite custom images before you build, because users notice when a setting they chose disappears.
Some behavior has no setting. PixelNest always removes metadata, including camera details and location, after turning photos upright. JPEG cannot store transparency, so transparent areas are filled with white rather than black. State rules like these in your prompt, or the AI will choose for you.
3. Plan the slow parts
Encoding a large photo can take seconds, and AVIF takes longer. Done on the page's main thread, it freezes scrolling and clicks. PixelNest runs the codecs in Web Workers instead: half the processor cores, at most three at once. A change to any setting compresses the batch again in the background.
Fit under size is the slowest feature, because the size of the result is only known after encoding. PixelNest first tries a high quality, 95, and stops if the image already fits. Otherwise it tries the lowest quality, 5; if even that is too large, the row shows Can't reach 100 KB, smallest shown for a 100 KB target. Otherwise it halves the range between the two until it has tried eight qualities, or six for AVIF. PNG is lossless, so it has no quality to search.
When an image cannot reach the target, shrinking it is often better than giving up. Turn on Plan mode, described in Direct the agent, to review how that interacts with the search:
Explain how Fit under size chooses a quality today. Then propose a change: when
the lowest quality is still over the target, reduce the image's dimensions in
10% steps, up to five times, until it fits. Show the final dimensions in the
row, and keep the current behavior when resizing is off.
4. Choose a starting point
Download Layerwise, sign in, and select a team.
PixelNest is an image compressor template with presets, quality or Fit under size, resizing and cropping, file name patterns, settings for individual images, a before-and-after compare view, and a ZIP of the whole batch. To start from it, open PixelNest, choose Use this template, pick a team and project name in Layerwise, then choose Copy to Layerwise. The codecs, workers, and size search are already implemented, so your work is choosing presets and options. Other workflows are in the template gallery.
To start from scratch, enter a description in Describe the app you want to build... on the team home page, including the decisions above:
Build an image compressor that runs entirely in the browser and never uploads
images. Accept JPEG, PNG, WebP, and AVIF files up to 50 MB by drag and drop,
file picker, or paste. Compress them in Web Workers with WebAssembly codecs,
with presets for web, social, and email, an output format, a quality slider,
and a Fit under size mode that finds the highest quality under a KB limit.
Remove metadata, show the size saved on each image, compare before and after
with a draggable divider, and download one image or a ZIP of all of them.
A blank start lets you choose each behavior, but you must verify each one yourself. The prompting guide explains how to describe users, data, and screens.
5. Test with real files
Use your own images, not only small samples: a large phone photo, a screenshot, and a PNG with a transparent background. Once the local preview loads, add them with the Web preset. A 3840×2160 photo should show 3840×2160 → 2048×1152 · WebP q80 and the percentage saved, and the page should stay responsive while the batch runs.
Switch Compression to Fit under size and enter 100. Every row should be at most 100 KB or show Can't reach 100 KB, smallest shown. Choose Compare on a photo and drag the divider at Fit, 100%, and 200% to check detail. Then open Image settings on the transparent PNG and choose JPEG: the row should show Custom, the transparent areas should be white, and the settings panel should report 1 image has own settings until you choose Apply to all.
Choose Download all and check the ZIP. Files should follow the pattern in File names, which is {name}-min by default, and should keep no location data. Try a file that is not an image, too; it should be skipped with a message rather than stopping the batch.
Finally, check the privacy promise. Open the preview in your default browser from the preview header, open its developer tools, and watch the network list while you compress a batch: no request should carry an image. Check the layout at phone width as well. If a check fails, open the preview console from Project actions; because the work happens in the browser, errors appear there rather than in Logs.
6. Publish and improve it
Choose Publish in the preview header, then Publish in the menu, and open the live URL when the release finishes. PixelNest keeps nothing on the server, so there is no data to move between Local and Online. Repeat the tests on a real phone with photos from its camera, and on an older laptop with a large batch, because speed and memory vary most there. The publishing guide covers release status.
Choose the next change from what you observe. Analytics shows pageviews and visitors, never the images people compress. Some images grow when compressed, such as a tightly compressed photo or a flat graphic saved as a photo format; today PixelNest still offers the larger file and shows the increase on its row. Keeping the original is a small, useful change:
When a compressed image is larger than the original, keep the original file
for that row's download and the ZIP, mark the row "Original kept", and leave it
out of the space saved. Add a setting to turn this off.
Start from PixelNest if on-device compression fits your users, or from a prompt if you need a different model. Either way, settle where images are processed and what each setting does before adding features. For the full project workflow, follow the Quick start.