How to Build a CRM with AI
Build a sales CRM in Layerwise. Define companies, contacts, deals, and tasks, set pipeline stages and a forecast, keep each workspace private, test, and publish.
Table of contents
A CRM starts as a list of people and quickly becomes more. Which company does this contact work for? Which deals will close this month, and how much are they worth? What did we promise on the last call? The answers depend on how records link to each other and how a deal moves from first contact to a decision. Settle those rules before asking an AI to build screens, and the first version is far easier to check.
This guide builds a sales CRM web app with Layerwise. You will define the records and their links, set the pipeline stages and forecast, decide who can see each record, start from the Orbit CRM template or a prompt, test, and publish.
1. Define the records and how they link
Most small CRMs need four kinds of record: companies, contacts, deals, and tasks. Orbit CRM stores all four in one table with a kind column, because they share a name, tags, an owner, and links to each other:
type CrmRecord = {
  id: string;
  workspaceId: string; // set on the server from the signed-in account
  kind: 'company' | 'contact' | 'deal' | 'task';
  name: string;
  status: string; // a deal's stage, or Prospect, Customer, or Partner
  value: number; // deal amount in US dollars
  closeDate: string; // YYYY-MM-DD, set when a deal is won or lost
  dueDate: string; // tasks only
  completed: boolean; // tasks only
  companyId: string | null;
  contactId: string | null;
  dealId: string | null;
  owner: string; // a name, not a login
  lostReason: string; // lost deals only
  tags: string[];
};
Contacts and companies also have fields such as email, phone, role, website, and industry. A deal links to a company and a contact; a task can link to a contact or a deal. One table keeps search, links, and the activity feed uniform. Separate tables suit a CRM where each kind has many fields of its own, so choose before the first version, because changing it later means moving data.
Two more tables record what happens. Timeline entries are notes, calls, emails, and meetings attached to a contact, company, or deal. The activity log gets a line for each change, such as Lost Cobalt pilot · Competitor, so you can see what changed without comparing records.
Decide what happens when a record is deleted. Orbit clears links that point to it, so a deal stays when its company is deleted but no longer shows that company.
2. Set the pipeline stages and forecast
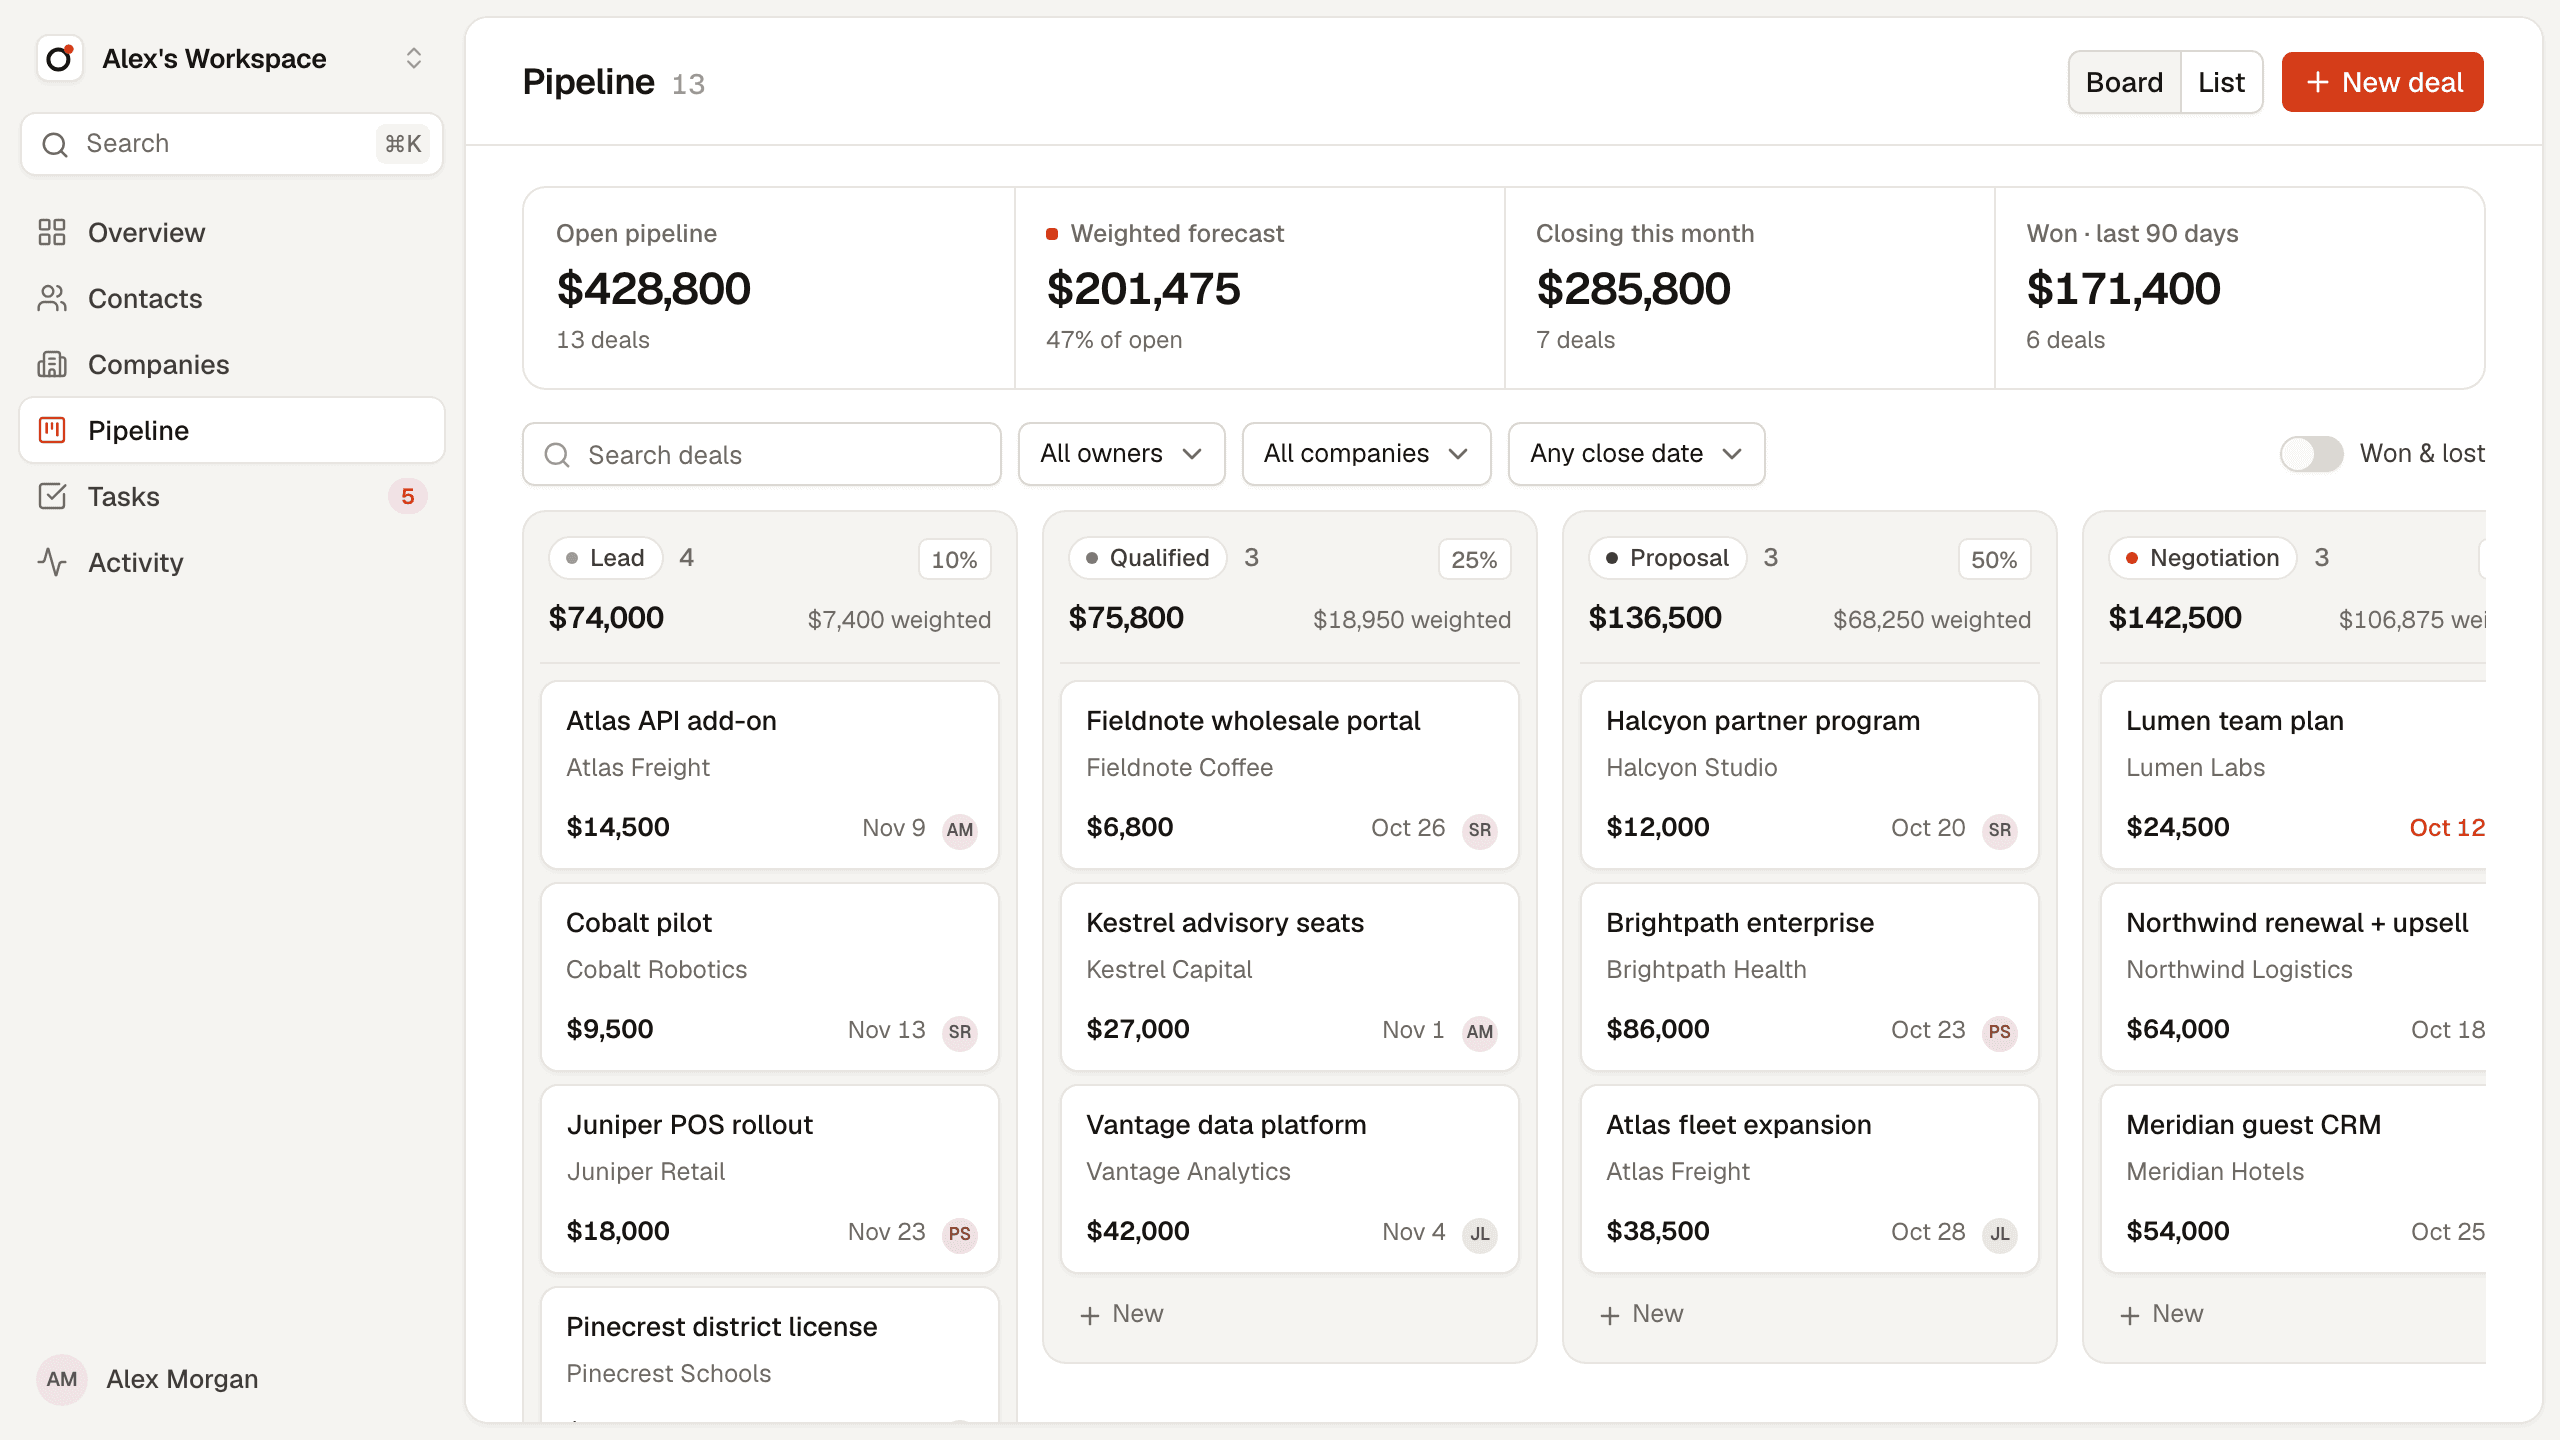
A pipeline is a fixed list of stages. Orbit uses Lead, Qualified, Proposal, Negotiation, Won, and Lost, and gives each open stage a win probability: 10%, 25%, 50%, and 75%. Its totals come from those numbers:
- Open pipeline adds up the value of every deal not yet won or lost.
- Weighted forecast adds up each open deal's value multiplied by its stage probability. Moving a $12,000 deal from Proposal to Negotiation raises it by $3,000.
- Win rate divides deals won by deals closed, counting only deals whose close date falls in the chosen range.
The close date matters more than it looks. When a deal moves to Won or Lost, Orbit sets its close date to that day, so revenue and win rate count the deal in the month it was decided. Marking a deal lost opens a dialog that requires one reason: Price, Timing, Competitor, No decision, Missing feature, or Other. A fixed list makes losses comparable later; free text would not.
In the template, the stages, probabilities, and lost reasons are defined in code. If your team sells differently, decide whether they should become per-workspace settings, because that changes the data model. Turn on Plan mode, described in Direct the agent, to review the change before code is written:
Move the pipeline stages, their win probabilities, and the lost reasons from
code into a Settings view stored per workspace. Explain the data change first.
When I rename a stage, keep its deals in it; when I delete a stage, ask which
stage its deals move to. Calculate the forecast from the stored probabilities.
3. Decide who can see each record
Orbit gives each account one private workspace, created the first time the account signs in. Every server function finds that workspace from the session and reads or writes only its records. The browser never sends a workspace ID, so a request cannot ask for someone else's records. Links are checked too: a deal's companyId must name a company in the same workspace. A copied link to another account's deal shows Record not found.
Owner is a free-text name, so a small team can split a pipeline without separate logins. Sharing one workspace among teammates is a larger change: it needs members, invitations, and rules about who may delete or import. Plan it before building:
Let a workspace have members. The owner invites people by email as Admin or
Member. Members see the same records; only admins can delete records or import
contacts. Replace the free-text Owner with a member picker, keep the workspace
check in every server function, and explain the data change first.
The template's demo needs no access rules at all. View demo opens a sample workspace, Acme Sales, that runs in the browser's memory and resets on reload, so visitors can try every view without an account or touching the database.
4. Choose a starting point
Download Layerwise, sign in, and select a team.
Orbit CRM is a sales CRM template with a pipeline board and list, contacts and companies with CSV import and export, record timelines, tasks, an activity feed, an overview with revenue charts, and a ⌘K command palette. To start from it, open Orbit CRM, choose Use this template, pick a team and project name in Layerwise, then choose Copy to Layerwise. Sign-in, the private workspace, and the forecast are already implemented, so your work is adapting the fields and stages. Other workflows are in the template gallery.
To start from scratch, enter a description in Describe the app you want to build... on the team home page, including the decisions above:
Build a sales CRM. Each account gets a private workspace with companies,
contacts, deals, and tasks. A deal has a value in US dollars, a company, a
contact, an owner name, and a stage: Lead, Qualified, Proposal, Negotiation,
Won, or Lost. Show deals on a board I can drag between stages, with an open
pipeline total and a forecast weighted by each stage's win probability. Ask for
a reason when a deal is lost. Contacts and deals have a timeline of notes and
logged calls. Check on the server that every record belongs to the signed-in
account's workspace.
A blank start lets you choose each rule, but you must verify each one yourself. The prompting guide explains how to describe users, data, and screens.
5. Test with sample data and two accounts
Once the local preview loads, sign up and open Overview. An empty workspace offers Load sample data, which adds 12 companies, 22 contacts, 29 deals, and 15 tasks. Switch between 30D, 90D, and 12M: Won revenue, Win rate, and the chart should change, while Open pipeline stays the same, because it counts every open deal whatever the range.
In Pipeline, drag a deal to the next column and confirm that the column totals and Weighted forecast change by the expected amount. Drag another deal onto Mark as lost, pick a reason, and choose Mark as lost. It should appear when you turn on Won & lost, and in Activity with its reason. Dragging works with a mouse; on a touch screen, use a card's menu and choose Move to a stage.
Open a deal and use the composer to Log call, then add a follow-up with + Task under Next steps and give it a due date. The task should appear on the deal and in Tasks under Today or Upcoming. On Contacts, choose Export, edit a few rows in the downloaded CSV, and bring them back with Import. A row that names a company not yet in the workspace should be reported by its row number instead of creating the company.
Then test access. Open a deal, choose Copy link, and open the preview in your default browser from the preview header. Sign up there as a second user, or create one with Add user in Authentication, and paste the link. You should see Record not found. Open Database, select Local, and confirm each row in crm_records carries the right workspace. Finally, check the pipeline and a record at phone width.
If a check fails, open the preview console from Project actions, or find the failed request in Logs.
6. Publish and improve it
Choose Publish in the preview header, then Publish in the menu, and open the live URL when the release finishes. Local and Online use separate databases, so accounts and records are not copied. Sign up on the live app, then load sample data to check it or import your real contacts. The publishing guide covers release status.
Choose the next change from how the CRM is used. Analytics shows pageviews and visitors, not the deals people enter. If a save or import fails, select Online in Logs and find the request. Contacts already move in and out as CSV; deals do not, and a spreadsheet of open deals is often where a team starts:
Add Import and Export to Pipeline for deals, like the contacts CSV: name,
value, stage, close date, owner, company, and contact. Match companies and
contacts by name within my workspace, report failed rows with their row
numbers, and accept up to 500 rows at a time.
Start from Orbit CRM if its pipeline fits how you sell, or from a prompt if you need a different model. Either way, settle the records, stages, and access rules before adding views. For the full project workflow, follow the Quick start.